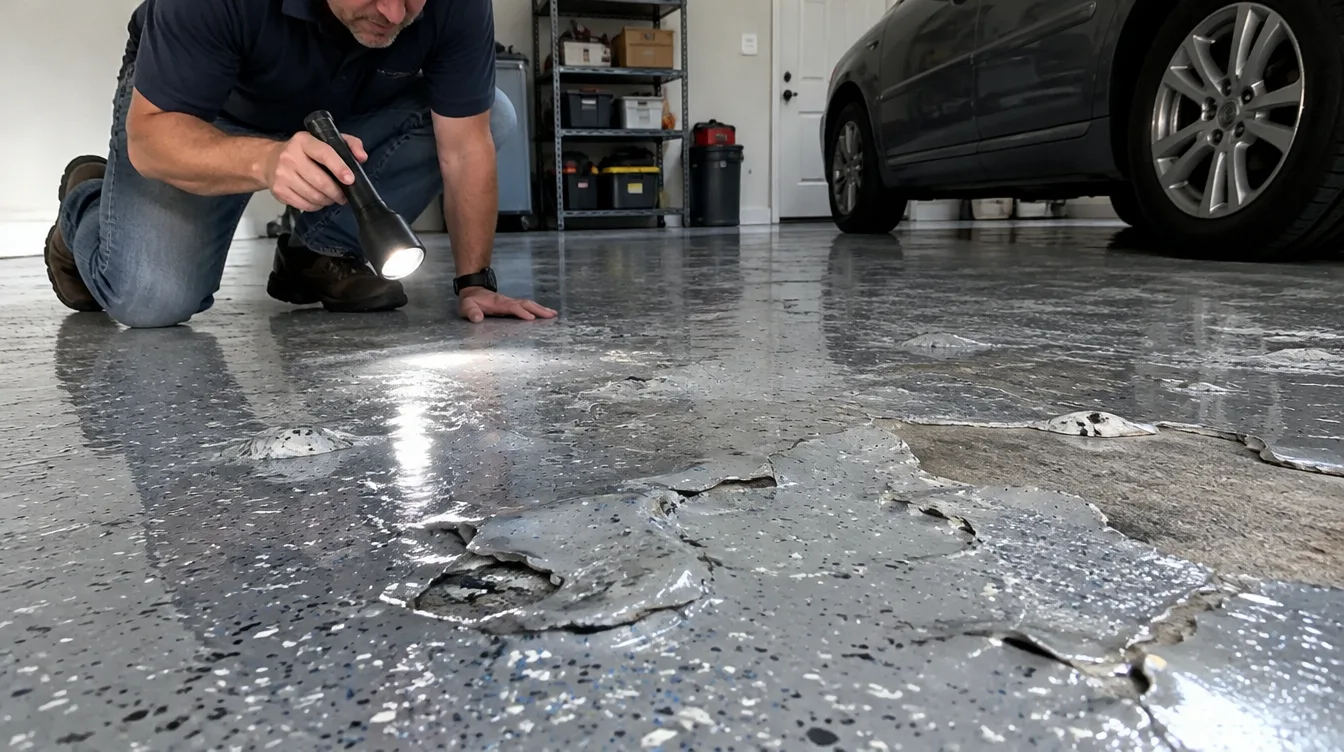
You can find most installation defects in an epoxy floor in about an hour with a bright flashlight, a tape measure and a camera. Hold the light low and skim it across the surface, then look for roller lap lines, pinholes, bubbles, soft or tacky patches, thin or ragged edges and joints that were coated over instead of treated. Each defect points to a specific step that was skipped or rushed. If your floor already shows one, our epoxy floor repair page explains how corrections are made, and this guide helps you work out what went wrong first.
Quick answer: the defects you can find in an hour with a flashlight
The defects worth checking are the six that show up within days of installation: lap lines and thin spots, pinholes, bubbles, soft or tacky areas, ragged edges, and bridged joints. A raking light is the single most useful tool, because it throws a long shadow off any surface irregularity that looks invisible under overhead lighting.
Run the inspection in this order and write down what you find:
- Turn off the room lights and use one flashlight held near the floor. Walk the whole floor with the beam skimming parallel to the surface, then repeat from the opposite direction.
- Mark each defect with painter's tape. Photograph it once with the tape and once close up with a coin or tape measure for scale.
- Walk the perimeter. Edges, door thresholds and the wall base are where thin coverage and skipped coving hide.
- Press and scratch a few spots. A cured floor feels hard and dry, and a fingernail should not leave a mark.
This guide is about diagnosing a floor that has already been installed. If you are still deciding who to hire, our post on how to choose an epoxy contractor covers the questions to ask before work begins, and our explainer on why epoxy peels covers the adhesion failures that appear months later.
Roller lap lines, holidays and thin spots
Lap lines are visible stripes where one roller pass dried before the next one overlapped it, and thin spots are areas where the coating was applied too lightly to build a uniform film. Both show up as changes in sheen or color when you look along the floor with a raking light.
Lap lines usually mean the installer worked too slowly or too far from the wet edge. Epoxy has a limited working time after mixing, and in a warm San Antonio garage that window can be short, especially if the slab was already warm from afternoon sun. When the crew falls behind, the leading edge starts to set before the next pass blends into it, and the overlap stays visible after cure.
A holiday is a spot the roller or squeegee missed entirely. It looks like a dull patch with the primer or the bare concrete color showing through. Holidays are most common along walls, around posts and under where equipment sat during the install.
Thin coverage is harder to see but easy to confirm. Flake and quartz floors should feel uniformly textured and look evenly covered, with no places where the base color shows through the broadcast. Look at three things:
- Uneven sheen. Glossy and flat patches on the same floor suggest uneven film thickness.
- Visible aggregate or flake tips. Rough points standing proud of the surface mean the topcoat did not fully encapsulate them.
- Color showing through. If bare concrete or primer shows between flakes, the broadcast or base coat was too light.
What it tells you: the application was rushed or under-supplied. A contractor who ran short of material often thins the coat to finish the room, which is why thin coverage tends to concentrate toward the last areas coated.
Pinholes, bubbles and outgassing craters
Pinholes are tiny round holes about the size of a pinprick, bubbles are raised domes, and craters are bubbles that broke and left a ring. All three come from air or vapor escaping through the coating while it was still wet or tacky.
Concrete is porous, and the pores hold air. When a coating goes on while the slab is warming, that air expands and rises through the wet film. If the film is already gelling it cannot close over the escape path, and the result is a hole or a bubble. This is called outgassing, and it is why the best practice is to apply epoxy while the slab is cooling or stable, not rising in temperature through the morning.
A skipped or thin primer is the other common cause. A primer coat penetrates the surface and seals the pores, so the main coat has less air to contend with. A floor with widespread pinholes across large areas usually points to a missing primer step, application during rising temperatures or both.
A short test helps separate the two cases:
- Count the defects in a one-square-foot area. A handful of isolated pinholes is a cosmetic issue, while dozens in the same area is a process problem.
- Look at where they cluster. Pinholes concentrated near the sunny wall or the garage door suggest temperature-driven outgassing, and pinholes spread across the whole floor suggest a surface-prep or primer issue.
- Press a bubble gently. A hollow bubble that cracks under light pressure is outgassing, while a bubble that feels spongy or lifts a wide sheet of coating is an adhesion or moisture problem.
Widespread bubbling that keeps appearing or growing may also signal moisture vapor pushing through the slab. In that case, ask whether the installer ran a moisture test before coating, using a method such as ASTM F2170 in-situ relative humidity probes or ASTM F1869 calcium chloride testing. Our guide to moisture testing before epoxy explains what those readings mean and what a contractor should have recorded.
Soft or tacky areas: mix ratio and cure failures
A soft or sticky patch means the resin and hardener did not react completely, and the affected area will not cure properly no matter how long you wait. This is the most serious defect on the list, because the repair is removal rather than recoating.
Two-part epoxy cures through a chemical reaction between the resin and the hardener, and the ratio has to be right. Too much of either component leaves unreacted material that stays soft. The same result comes from inadequate mixing, where one part of the batch ends up resin-rich and another hardener-rich. Streaks, swirls and small sticky islands in an otherwise hard floor are the typical signs of poorly mixed material that was poured out without scraping the sides and bottom of the bucket.
Temperature matters here too. Every product data sheet gives an application range for slab and air temperature, and applying outside it slows or stalls the cure. A floor installed on a cold morning that never warmed up, or applied near the upper limit on a hot afternoon, can show soft areas that other parts of the floor do not.
How to check without damaging the floor:
- Wait for the data sheet's full cure time. Light foot traffic can start after a day or so on many systems, but full chemical cure takes longer, and the product data sheet gives the number.
- Press a thumb firmly on suspect areas. If it feels tacky, leaves an impression or picks up dust, it has not cured.
- Do not scrape it yourself. Document it with photos and report it. Cutting into the area can make a warranty discussion harder.
What it tells you: a mix ratio, mixing or temperature step was skipped. Tacky areas normally have to be taken out entirely and recoated, because a new coat over uncured material will not bond.
Thin or ragged edges and missed coving
Edges are where a floor finishes, and sloppy edges are one of the clearest signs the crew rushed the final steps. Look along every wall, around columns and across door thresholds.
Check these specific points:
- A wavy or ragged line where coating meets the wall. It means the installer did not tape off or cut in carefully.
- Coating that thins to nothing at the perimeter. It means the roller never reached into the corner, which leaves an unprotected strip of concrete.
- A cove that was promised but not installed. A cove base curves the coating up the wall a few inches, and without it moisture and cleaning water can get under the edge.
- Chipped or lifting edges at thresholds. Doorways take impact, and a thin edge there will chip within weeks.
Compare what you see against the written scope. If the quote said the floor would have a cove base or a defined edge detail, the contract is the test. Where the quote said nothing, the standard for a clean, finished edge is still reasonable to expect, and a contractor who cut corners at the perimeter usually did so elsewhere too.
Unfilled or bridged control joints
Control joints are cuts made in a slab so that it can crack in a straight line at a planned location instead of randomly. A floor coating that was rolled straight across an open joint has been bridged, and the coating will crack along the joint as the slab moves.
Concrete shrinks as it cures and moves with temperature changes, and the joint is where that movement concentrates. ACI 302.1R, the guide for concrete floor and slab construction, describes the role of joints in controlling cracking. A coating system has to respect that movement. The accepted approach is to treat the joint with a flexible joint filler or sealant before coating, and to cut or keep the joint through the coating so it can move.
A bridged joint is easy to spot. Look for a hairline crack in the coating that runs in a perfectly straight line, often in a grid pattern matching the slab layout. It may be invisible on day one and appear over the first few months as the slab moves. Open joints that were filled with rigid epoxy can show the same line, because rigid fill cannot flex.
Not every crack in a coating comes from a joint. Random cracks away from any saw cut are usually a slab crack that was not treated before coating, and our guide to epoxy floor crack repair covers how those are handled.
Defect table: symptom against probable cause and likely remedy
This table pulls the checks together. Use it to match what you see to the likeliest cause, then confirm with your documentation before you contact the installer.
| Symptom you see | Probable cause | When it shows | Likely remedy |
| Straight stripes or sheen changes | Lap lines from slow application at the wet edge | Immediately | Sand and recoat the affected sections |
| Dull patch with color showing through | Holiday or thin film, missed area | Immediately | Spot recoat after abrading |
| Many tiny round holes | Outgassing, thin or missing primer | Immediately | Grind, fill and recoat the area |
| Raised domes that feel hollow | Trapped air from rising slab temperature | Hours to days | Remove blister, patch and recoat |
| Spongy bubbles lifting wide sheets | Moisture vapor or poor adhesion | Days to months | Moisture test, remove failed coating, mitigate |
| Soft or sticky patch | Wrong mix ratio, poor mixing, wrong temperature | First days | Remove uncured material entirely, recoat |
| Ragged line or no cove at walls | Rushed edge work, scope not followed | Immediately | Correct edge detail, install cove if specified |
| Straight hairline crack along a joint | Control joint coated over rigid | Weeks to months | Cut the joint, fill with flexible sealant |
| Peeling in patches | Inadequate surface profile, contamination, moisture | Months to a year | Remove, regrind, and recoat with the proper profile |
Surface preparation is the root of many of these problems, and it is the step that is hardest to see after the fact. The coating industry measures surface profile against ICRI Technical Guideline 310.2R, which defines concrete surface profile grades from CSP 1 to CSP 9, and adhesion can be verified with a pull-off test under ASTM D4541. If you suspect poor prep, our guide to concrete surface preparation for epoxy explains what proper grinding looks like.
What to document and how to raise it with the contractor
Document the defects first, then raise them in writing and promptly. A clear record makes the conversation about facts instead of opinions, and it protects any warranty rights you have.
Collect this before you call:
- Photographs with scale and date. Take wide shots of each area and close-ups with a tape measure beside the defect.
- A simple floor sketch. Mark where each defect sits, numbered to match the photos.
- The paperwork. Gather the signed quote, the scope of work, the product names and any warranty terms.
- The install dates and weather. Note the day the floor was coated and roughly how hot or cold the garage was.
- Your own test notes. Record what you pressed, scratched or measured, and what happened.
Then send a short, specific message by email or text so there is a written trail. Describe what you found, attach the photos, quote the relevant line of the scope and ask for a site visit by a set date. Keep the tone factual. Most reputable installers want the chance to correct a defect, because a repair under their own warranty costs far less than a dispute.
If the installer will not respond or the defect is beyond a simple touch-up, get a second opinion from a different company before agreeing to any fix. A good inspection report states what is wrong, what caused it and what the correction involves. For a floor that needs correction, you can read about our repair process and request a written assessment.
Timing matters. Cosmetic defects are visible the day the floor cures, and the sooner they are reported the easier they are to attribute to the installation. Adhesion problems may take months, so keep your photos and records on file and re-inspect the floor at the three-month and twelve-month marks.
Frequently asked questions
How can I tell if my epoxy floor was installed badly?
Look for visible roller lap lines, pinholes, bubbles, soft or tacky patches, thin coverage at edges, and joints that have been bridged rather than treated. Each one points at a specific step that was done wrong.
Are bubbles in an epoxy floor normal?
A few isolated pinholes can happen, but widespread bubbling usually means outgassing from the slab, application in rising temperatures, or a primer step that was skipped.
Why is part of my new epoxy floor still sticky?
Tacky areas generally indicate an incorrect mix ratio, inadequate mixing, or application outside the product's temperature range. The affected area normally has to be removed rather than coated over.
Is it my contractor's responsibility to fix these defects?
Workmanship defects typically fall under the installer's warranty, which is why the terms and the documentation matter. Photograph what you find, note dates, and raise it in writing promptly.
How soon do installation defects appear?
Cosmetic defects are visible immediately once the floor cures. Adhesion problems from poor preparation or untested moisture often take several months to a year to show as peeling or blistering.
If you are looking at a floor that does not look right, call (830) 355-3303 for a free on-site measure and written quote. We inspect the surface, tell you in writing what went wrong and explain what a correction involves.