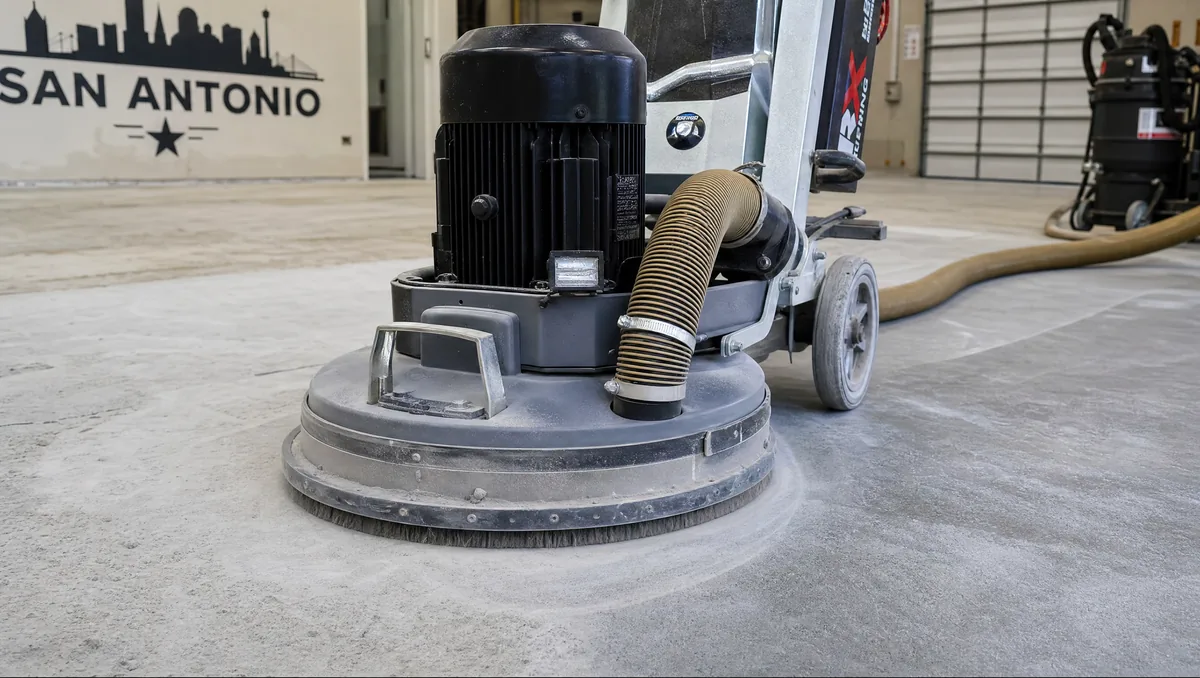
When a homeowner watches a ProEpoxy crew arrive for a garage floor installation, the first thing that surprises them is what happens before a single drop of epoxy is mixed. For most of the first day - sometimes all of it - the crew runs a heavy diamond grinder over every inch of the slab. It is loud, it kicks up a cloud of fine dust despite the extraction hose, and it leaves the floor looking like raw concrete again. People watch this and wonder: is this really necessary?
Yes. Surface preparation - and specifically diamond grinding - is the single most important factor in how long an epoxy floor coating lasts. A system installed over properly ground concrete will bond at the molecular level and hold for 15–20 years. The same system installed over concrete that was only acid-etched or pressure-washed can begin peeling within 12–18 months. The difference is not the product. It is the prep.
What Is Concrete Floor Grinding?
Concrete floor grinding is the mechanical process of removing the top layer of a concrete slab using rotating diamond-tipped tooling. The equipment - a walk-behind planetary grinder or a single-head grinder for tight areas - presses multiple diamond segments against the surface at high RPM. The diamonds are harder than the concrete matrix, so they cut through it, progressively removing material and exposing the aggregate layer beneath.
The depth of removal depends on the goal. For surface preparation before epoxy, a contractor typically targets a Concrete Surface Profile (CSP) of 2–4 on the ICRI scale - enough texture to give the coating a mechanical anchor, but not so deep that it creates an uneven substrate that telegraphs through the finished floor. A CSP 2 surface feels like 60-grit sandpaper to the touch. That texture creates thousands of micro-peaks and valleys per square inch for the epoxy to grip.
What the grinder removes matters as much as how deep it goes. Laitance - the weak, powdery layer of calcium carbonate and cement fines that forms on the surface of concrete as it cures - must be completely removed before any coating is applied. Laitance looks like solid concrete but bonds poorly to both the slab beneath it and the coating above it. A floor coated over laitance will delaminate; it is not a question of if, but when.
Why Surface Preparation Determines Coating Longevity
Epoxy bonds to concrete through a combination of mechanical adhesion (the coating flowing into surface pores and locking in when it cures) and chemical adhesion (a reaction between the epoxy and the alkaline concrete surface). Both mechanisms require a clean, profiled surface to work.
A contaminated surface - oil, grease, curing compound residue, old paint, or even mineral efflorescence - creates a barrier between the epoxy and the concrete. The coating bonds to the contaminant, not the slab. When the contaminant eventually releases, the coating releases with it. This is the root cause of most epoxy delamination failures, and it is almost always avoidable with proper grinding and contamination removal.
San Antonio's soil and climate add a layer of complexity. Bexar County's expansive clay soil exerts significant upward pressure on slabs during wet periods, and the city's temperature swings - from sub-freezing nights in January to 105°F July afternoons - cause concrete to expand and contract in cycles that put stress on the coating bond. A mechanically prepared surface handles that stress; a poorly prepared one does not.
The Grinding Process Step by Step
Step 1 - Inspection and Assessment
Before any grinding begins, the crew walks the slab and checks for moisture (ASTM F2170 RH probe or calcium chloride test on older slabs), existing coatings or sealers, oil contamination, cracks and joints, and any high spots or low spots that need attention. The inspection determines which diamond tooling to specify and whether any pre-treatment - degreasing, crack repair, or moisture mitigation - is needed before grinding starts.
Step 2 - Diamond Tooling Selection
Diamond segments come in different bond hardnesses, measured on a soft-to-hard scale. Soft-bond diamonds are used on hard concrete; they wear faster and expose fresh diamond edges continuously. Hard-bond diamonds are used on soft or abrasive concrete; they hold the segment together longer. Using the wrong bond on a San Antonio slab - which typically runs on the harder side due to the limestone aggregate common in local ready-mix - produces glazed-over tooling that stops cutting and heats the surface instead. Our crews carry multiple tooling sets and test on a small area before committing to the full floor.
Step 3 - Grinding Passes
The grinder makes overlapping passes across the slab in a systematic pattern. The first pass removes laitance and any surface contamination. Subsequent passes refine the profile and address any remaining high spots. The extraction system - a commercial dust collector attached directly to the grinder - captures the vast majority of the fine silica dust, keeping the garage livable and protecting the crew's lungs from respirable crystalline silica, which is an OSHA-regulated hazard.
Step 4 - Crack and Joint Repair
After grinding exposes the full slab surface, cracks and control joints are addressed before coating. Hairline cracks are typically bridged with the epoxy base coat itself. Structural cracks wider than 1/8" are filled with a semi-rigid polyurea crack filler, which cures in minutes and can be ground flush with the slab surface. Control joints - the intentional cuts in the slab designed to direct cracking - are either left open and caulked after the coating cures, or filled and bridged depending on the client's preference and the joint's activity level.
Step 5 - Final Vacuum and Blow-Down
Before primer or base coat goes down, the entire floor is vacuumed and blown clean with compressed air. Any grinding dust left on the surface will compromise adhesion - the bond is only as good as what the epoxy contacts. This step takes 20–30 minutes and is non-negotiable. Some contractors skip it to save time. You will know they did when your floor starts delaminating in patches.
Grinding vs Shot Blasting: Which Does ProEpoxy Use?
Shot blasting is the other common mechanical preparation method. A shot blaster propels small steel balls at high velocity against the concrete surface, creating a rough, peened texture. It is fast - a shot blaster can prep a 1,000 sq ft warehouse floor in under an hour - and it excels at producing a consistent CSP 4–6 profile on large, open slabs.
The limitation is geometry. Shot blasters struggle near walls, in corners, around floor drains and columns, and in any space that cannot fit a 24"–36" wide machine. On a residential garage with a perimeter of walls, support columns, and service door openings, a shot blaster leaves an unprepared border of 8–12 inches around every obstacle - areas that require hand grinding to finish. In a space like that, switching between machines takes longer than just grinding the whole floor from the start.
ProEpoxy uses diamond grinding as our primary prep method across all project types. For large open commercial slabs - warehouse floors over 5,000 sq ft - we use a combination approach: shot blast the open field area for speed, then grind the perimeter and obstacles by hand. On residential garages and commercial spaces under 5,000 sq ft, we grind the entire floor. The result is a consistent, fully profiled surface from wall to wall with no skipped areas.
Common Signs Your Floor Was Not Properly Prepared
If you have an existing epoxy floor that is showing problems - or if you are evaluating contractor bids for a new installation - these are the signs that preparation was inadequate:
- Peeling in patches near walls and corners: The grinder could not reach those areas; the contractor skipped hand grinding and coated over raw or laitance-covered concrete.
- Bubbling or pinholes in the surface: Moisture vapor pushing through a coating that was applied over a non-profiled surface, or over a slab that failed the moisture test.
- Delamination starting at the perimeter: Often caused by coatings applied over curing compounds that the contractor did not remove. Curing compounds are sprayed on new slabs at the construction site and must be fully ground off before coating.
- Peeling within the first 12 months: Almost always a preparation failure. A properly prepped and coated floor does not peel in the first year under normal residential use.
- Hot-tire pickup within weeks of installation: This can be a product issue, but it is also frequently caused by an acid etch (rather than mechanical grinding) that did not open the concrete surface enough to achieve proper bond strength.
The cost of repairing a failed coating - stripping, re-grinding, patching, and recoating - typically runs 60–80% of the cost of the original installation. Proper preparation the first time is far cheaper than fixing a failure later.
How Much Does Grinding Add to the Project Cost?
On a standard two-car garage (500–600 sq ft) in San Antonio, diamond grinding typically adds $0.75–$1.50 per square foot to the project cost, factoring in equipment, labor, and dust collection. On a total project cost of $2,500–$4,000 for a chip-broadcast epoxy system, that is $375–$900 - roughly 15–25% of the total.
| Prep Method | Typical Cost Add | Result |
|---|---|---|
| Acid etch only | $0.10–$0.20/sq ft | CSP 1–2; adequate for light-duty only |
| Diamond grinding (single pass) | $0.75–$1.00/sq ft | CSP 2–3; standard for residential epoxy |
| Diamond grinding (multi-pass) | $1.00–$1.50/sq ft | CSP 3–4; required for 100% solids and commercial |
| Shot blast + perimeter grind | $0.80–$1.20/sq ft | CSP 4–6; standard for warehouse and industrial |
Any bid that does not include a line item for mechanical surface preparation - or that quotes preparation by acid etching only for a full epoxy system - is a red flag. Acid etching is a supplement to grinding, not a replacement. It can remove minor surface contamination and slightly open the pores of lightly sealed concrete, but it cannot remove laitance, old coatings, or embedded oil contamination, and it does not create sufficient mechanical profile for a durable high-build epoxy bond.
At ProEpoxy, every quote includes a line item for diamond grinding as standard. We do not offer an "acid etch only" option because we have seen what happens to floors installed that way - and we would rather explain the cost upfront than explain a warranty claim 14 months later.
The Bottom Line
Concrete floor grinding is the invisible foundation of every epoxy installation. The finished floor gets all the attention - the color, the gloss, the chip pattern - but what determines whether that floor looks the same in year 15 as it did in year 1 is what happened before the first coat was ever applied. A diamond-ground slab with proper profile and zero contamination gives epoxy everything it needs to bond permanently. Anything less is a gamble.
If you are planning a garage floor or commercial coating project in San Antonio and want to see exactly how our preparation process works - or understand what separates a ProEpoxy installation from a box-store kit or a budget contractor - book a free walkthrough. We will show you the slab condition, explain the prep it needs, and give you a written spec before you commit to anything.
Get a Free Surface Prep Assessment for Your San Antonio Slab
Before any quote, ProEpoxy inspects your concrete for moisture, contamination, and condition - and tells you exactly what prep it needs. No surprises on job day. Our own crews grind, patch, and coat every floor we install.
Request Free Estimate →